My Complete Website Design Process From Start to Finish
A practical look at my complete website design process, from research and sitemap planning to wireframes, UI design, responsive layouts, prototyping and developer handoff.
- Author
- Hasnain Ansari
- Published
- Reading time
- 10 min read
A well-designed website doesn't begin with colors, animations or a polished homepage.
Before I start designing, I need to understand what the website is supposed to achieve, who it is being designed for and how the information should be organized.
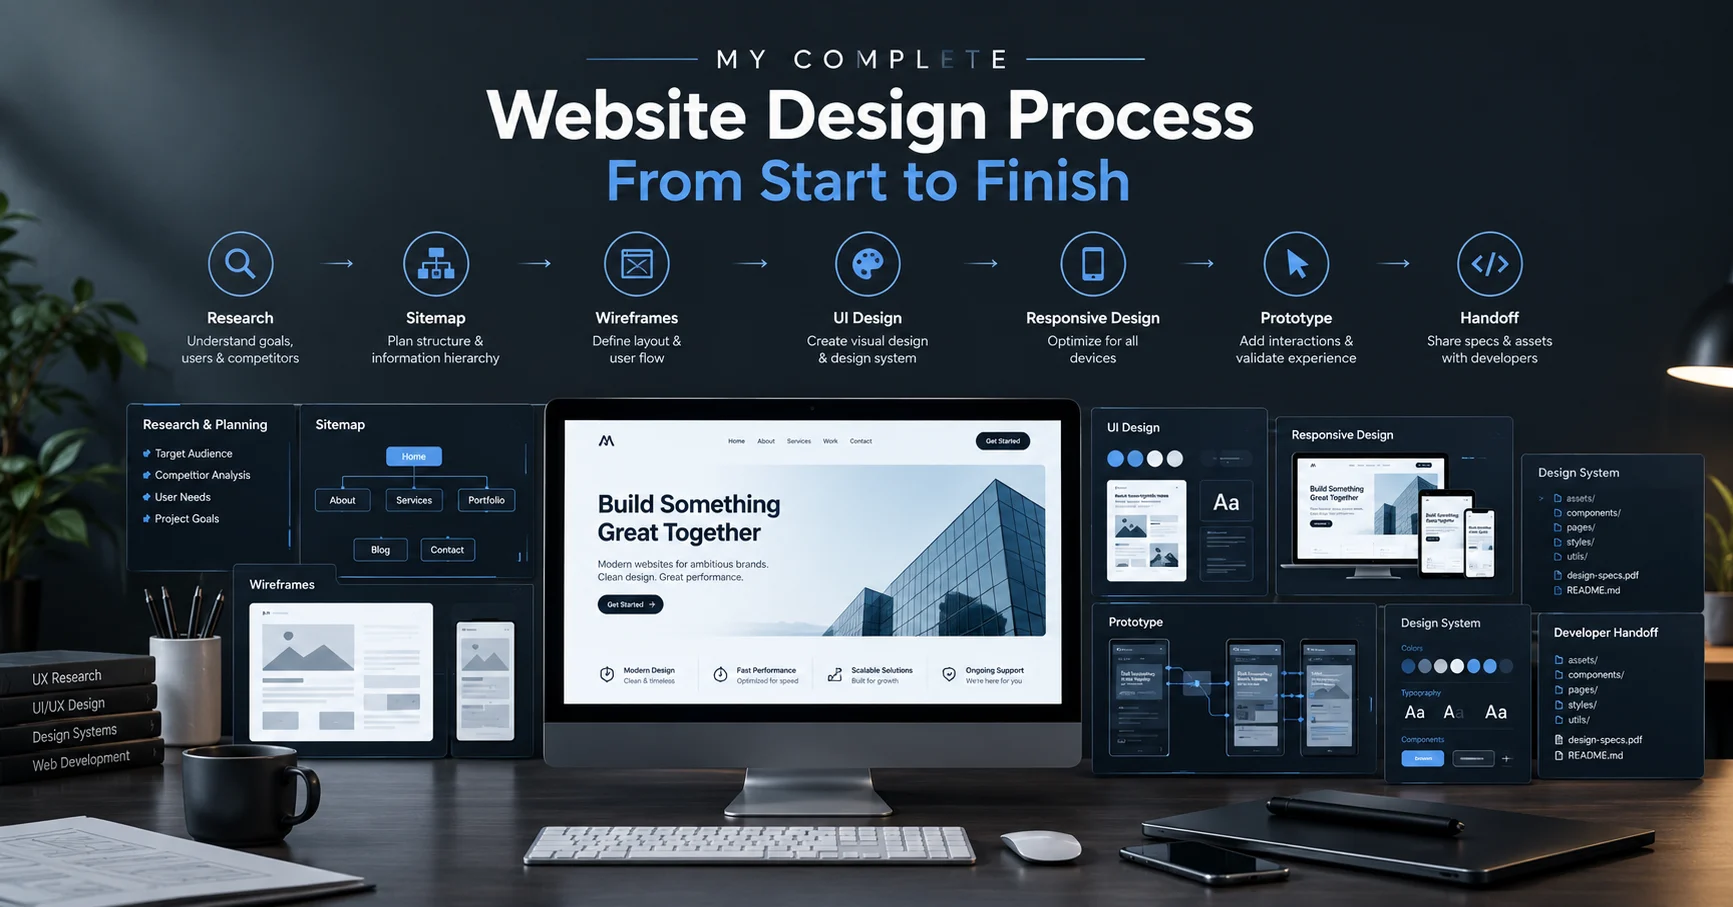
My website design process combines research, information architecture, wireframing, UI design, responsive design, prototyping and development handoff.
The exact workflow can change depending on the project, but I generally follow a structured process that takes a website from an initial idea to a design that is ready for development.
In this article, I'll walk through my complete website design process step by step.
1. Understanding the Website's Purpose
The first step is understanding why the website needs to exist.
A portfolio website, business website, e-commerce store and web application can all require completely different design decisions.
I start by identifying things such as:
- What is the main purpose of the website?
- Who is the target audience?
- What problem should the website solve?
- What action should visitors take?
- What information needs to be presented?
- What pages are required?
- Are there existing brand guidelines?
- What technical requirements should the design support?
For example, a service business may need visitors to understand its services and contact the business, while an e-commerce website needs to make product discovery and purchasing straightforward.
Understanding the objective gives the rest of the design process direction.
2. Research Before Designing
I don't start every project with the same amount of research.
The depth depends on the project, but I usually look at the business, target audience, competitors, existing websites and industry expectations.
I may review:
- Competitor websites
- Existing brand identity
- Industry design patterns
- User expectations
- Existing content
- Similar digital products
- Navigation patterns
- Common conversion points
The goal isn't to copy another website.
Research helps me understand the environment in which the website will compete and gives me context for making design decisions.
3. Planning the Website Sitemap
Once I understand the project, I plan the website structure.
This is where a sitemap becomes useful.
A simple business website might have:
Home → About → Services → Work → Contact
A larger website might contain multiple categories, service pages, project pages and supporting content.
The sitemap helps determine:
- Which pages are required
- How pages relate to each other
- Where information belongs
- How users will navigate the website
- Which pages are most important
A clear sitemap also provides a useful foundation for development and SEO.
Instead of designing random pages independently, I can see how the complete website fits together.
4. Planning the User Journey
After defining the pages, I think about how users will move through the website.
For example:
Homepage → Service → Case Study → Contact
or:
Homepage → Product Category → Product → Checkout
The exact journey depends on the website's objective.
I consider:
- Primary navigation
- Secondary navigation
- Calls to action
- Important information
- Conversion points
- Internal links
- Next steps
A visitor shouldn't have to work unnecessarily hard to figure out where to go next.
5. Creating Wireframes
Once the structure is clear, I create wireframes.
Wireframes allow me to focus on layout and information hierarchy before visual styling.
At this stage, I think about the position of:
- Header
- Navigation
- Hero section
- Headings
- Content blocks
- Images
- Buttons
- Forms
- Cards
- Footer
I don't need every color, shadow or animation yet.
The purpose of a wireframe is to answer a simple question:
Does the page structure make sense?
If the structure isn't working, it's much easier to change it at the wireframe stage than after the entire visual design has been created.
6. Establishing the Visual Direction
After the structure is working, I start defining the visual language of the website.
This can include:
- Typography
- Color palette
- Spacing system
- Grid
- Border treatment
- Buttons
- Cards
- Icons
- Image style
- Visual hierarchy
I prefer creating a consistent design system instead of making every section look completely different.
For example, buttons should have consistent styling, typography should follow a clear hierarchy and spacing should follow a predictable system.
This makes the website feel more intentional and makes the design easier to implement.
7. Designing the User Interface
Now I move from structure to detailed UI design.
This is where the wireframe becomes a polished interface.
I work on:
- Typography hierarchy
- Layout
- Colors
- Components
- Images
- Buttons
- Navigation
- Cards
- Forms
- Content sections
- Interaction states
Visual hierarchy is particularly important.
When someone lands on a page, they should be able to understand the important information without having to analyze every element.
The design should guide attention naturally.
8. Designing Around Real Content
I try not to design an entire website around unrealistic placeholder text.
Real content can be much longer or shorter than placeholder content.
A two-word heading behaves differently from a ten-word heading. A short description creates a different card height from a long description.
Therefore, I consider realistic content during the design process whenever possible.
This helps prevent:
- Broken layouts
- Unexpected text wrapping
- Uneven cards
- Excessive empty space
- Poor hierarchy
- Difficult-to-maintain sections
The interface should support the content rather than force the content into an artificial layout.
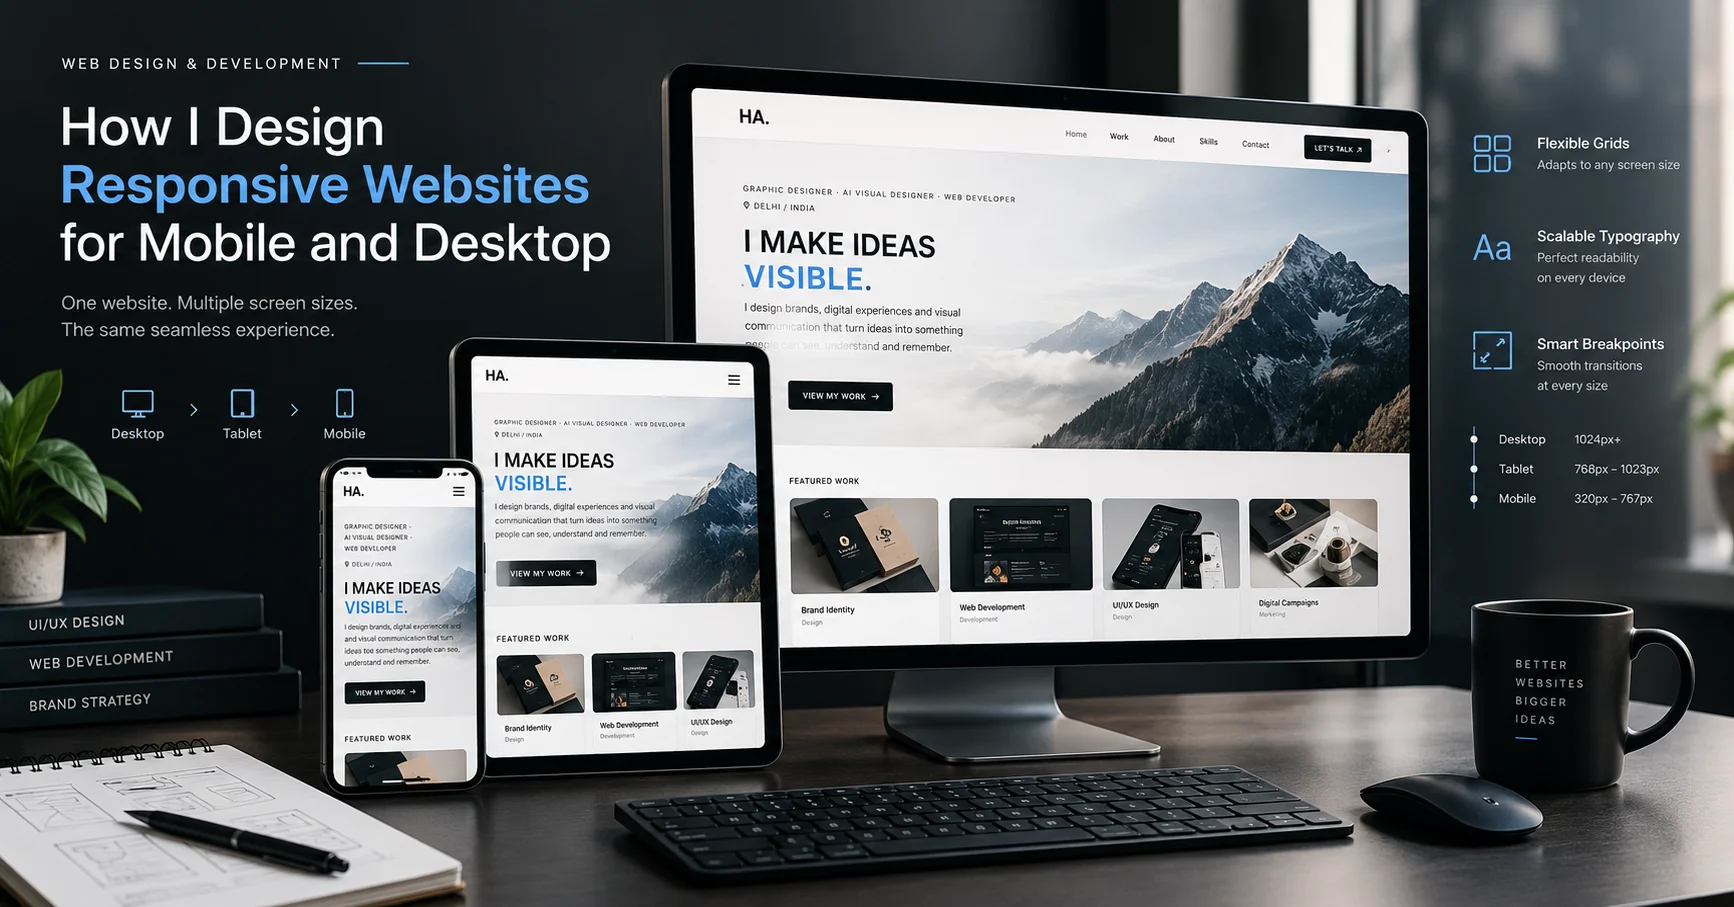
9. Designing Responsive Websites
A website isn't finished just because the desktop version looks good.
I also plan how the interface will adapt to mobile, tablet and desktop screens.
Responsive design can involve changes to:
- Navigation
- Grid structure
- Typography
- Spacing
- Image dimensions
- Button placement
- Section order
- Content stacking
- Touch interactions
For example, a three-column desktop layout might become a single-column mobile layout.
Responsive design isn't simply about shrinking a desktop website.
It is about adapting the experience to the available screen size and interaction method.
10. Creating Reusable Components
For larger websites, I look for elements that can be reused throughout the interface.
Common examples include:
- Buttons
- Cards
- Navigation
- Forms
- Project blocks
- Headings
- Tags
- Content sections
- Footer elements
Reusable components improve consistency.
They also make development easier because the same design patterns can be implemented repeatedly instead of creating every element from scratch.
11. Considering Accessibility
Accessibility should be considered during design rather than treated as an afterthought.
I pay attention to things such as:
- Text readability
- Contrast
- Font sizes
- Clear interactive elements
- Understandable navigation
- Form usability
- Keyboard interaction requirements
- Meaningful visual hierarchy
The objective is to make the interface understandable and usable for as many visitors as reasonably possible.
12. Planning Interactions and Motion
Once the core interface is established, I consider interactions and animations.
Motion can be useful for:
- Navigation transitions
- Hover states
- Loading states
- Page transitions
- Feedback
- Showing changes in interface state
However, I don't believe every element needs an animation.
I prefer motion that has a purpose and supports the user experience.
A subtle transition can often communicate more effectively than an interface filled with unnecessary effects.
13. Building an Interactive Prototype
For projects where interaction needs to be tested, I create an interactive prototype.
Instead of viewing individual screens, I can connect them into a user journey.
For example:
Homepage → Services → Service Detail → Contact
This helps me evaluate the experience before development.
A prototype can reveal:
- Confusing navigation
- Missing actions
- Unnecessary screens
- Poor transitions
- Broken user journeys
- Weak calls to action
It is much easier to solve these issues during design than after development.
14. Reviewing the Complete Design
Before handing the design over for development, I review it as a complete website rather than as individual screens.
Visual consistency
Are typography, spacing, buttons, cards and other components consistent?
User experience
Can users understand where they are and what they should do next?
Responsive behavior
Does the layout work logically across different screen sizes?
Content
Does realistic content fit naturally into the design?
Accessibility
Is important information readable and are interactive elements understandable?
Performance
Are there unnecessary visual effects or oversized assets that could create implementation or performance problems?
This review helps identify problems before development begins.
15. Preparing the Design for Development
A design isn't complete if the developer has to guess how everything should work.
During handoff, I make important design decisions clear.
This can include:
- Typography
- Colors
- Spacing
- Component specifications
- Responsive behavior
- Image dimensions
- Button states
- Form states
- Interaction behavior
- Animation guidance
Clear handoff makes the transition from design to development much smoother.
16. Designing With Development in Mind
Because I also work with frontend development, I naturally think about implementation while designing.
A design may look impressive in a design tool, but that doesn't automatically make it a good website solution.
I consider:
- HTML structure
- CSS layout
- Responsive behavior
- Component architecture
- Image optimization
- Performance
- Accessibility
- SEO requirements
This helps reduce the gap between what is designed and what can realistically be built.
17. Reviewing the Website After Development
My design process doesn't completely stop when development starts.
Once the design is implemented, I review the actual website.
I compare the working version with the intended design and check:
- Typography
- Spacing
- Alignment
- Images
- Responsive behavior
- Navigation
- Buttons
- Forms
- Animations
- Content
- Component consistency
A design file and a real browser environment are not the same thing.
Some issues only become obvious when the website is actually running.
My Complete Website Design Workflow
My overall website design process can be summarized as:
1. Research
Understand the project, audience, business and requirements.
2. Sitemap
Define the website's pages and information architecture.
3. User Flow
Plan how visitors move between important pages and actions.
4. Wireframes
Create the basic page structure and content hierarchy.
5. Visual Direction
Define typography, colors, spacing and visual language.
6. UI Design
Design the detailed interface and reusable components.
7. Responsive Design
Adapt the experience for mobile, tablet and desktop.
8. Prototype
Connect screens and test important interactions and user journeys.
9. Review
Check visual consistency, usability, accessibility and implementation requirements.
10. Handoff
Prepare the design and specifications for development.
11. Implementation Review
Check the developed website against the intended design and refine where necessary.
How Website Design and Development Work Together
I don't see website design and development as completely separate processes.
Design determines the structure and experience, while development turns those decisions into a functional website.
For example:
Design: A responsive three-column project grid.
Development: A responsive CSS or component-based layout that changes the number of columns according to the available screen size.
The earlier development considerations are included in the design process, the easier this transition becomes.
This is particularly useful when working on websites that require custom interactions, databases, APIs or other functionality.
How SEO Fits Into My Website Design Process
SEO shouldn't be something added only after the website has been designed.
I consider SEO-related structure during the design process.
This can include:
- Logical page hierarchy
- Clear headings
- Crawlable navigation
- Internal linking opportunities
- Content structure
- Image considerations
- Mobile usability
- Performance
- Page-specific content
The visual design still needs to serve users first, but the structure should also provide a strong foundation for search engines to understand the website.
Common Website Design Mistakes I Try to Avoid
Some problems appear repeatedly in website projects.
Starting with visual design too early
Jumping directly into colors and effects can hide structural problems.
Designing only for desktop
A website needs to work beyond a single screen size.
Using unrealistic placeholder content
Real content can behave very differently from placeholder text.
Making every section look different
Too many unrelated visual styles can make a website feel inconsistent.
Adding unnecessary animations
Motion should support the experience rather than distract from it.
Ignoring development requirements
A design should be practical to implement.
Treating SEO as an afterthought
The website structure should provide a foundation for search visibility from the beginning.
Frequently Asked Questions
What are the main steps in the website design process?
A typical website design process can include research, sitemap planning, user flows, wireframing, visual direction, UI design, responsive design, prototyping, testing, design review and development handoff.
What comes before UI design?
Research, website structure, user flows and wireframes generally come before detailed UI design. These steps help establish what the interface needs to accomplish before visual styling begins.
Why is a sitemap important in web design?
A sitemap shows how the website's pages are organized and related. It helps with navigation, content planning, development and the overall information architecture of the website.
What is the difference between a wireframe and a prototype?
A wireframe focuses mainly on page structure and content hierarchy. A prototype connects screens and interactions so the user journey can be experienced before the website is fully developed.
Why does responsive design matter?
Visitors can access websites from phones, tablets, laptops and desktop monitors. Responsive design allows the interface and content to adapt to different screen sizes and interaction methods.
What happens after the website design is finished?
The design is typically prepared for development through handoff specifications. After implementation, the working website can be reviewed against the original design and refined where necessary.
How long does the website design process take?
There isn't one fixed timeline. It depends on the number of pages, project complexity, amount of research, content availability, revision requirements and the level of interaction involved.
Final Thoughts
My website design process is about more than creating attractive screens.
I start by understanding the problem, researching the project and organizing its information. Then I move through sitemap planning, user flows, wireframes, visual design, responsive layouts and prototyping before preparing the design for development.
The exact process changes depending on the project, but the basic principle stays the same:
Understand → Structure → Wireframe → Design → Prototype → Test → Handoff → Review
A strong website design should look intentional because the decisions behind it were intentional.
For me, the goal is to create a website that is visually polished, easy to navigate, responsive across devices and practical to turn into a real digital experience.
About the Author
Hasnain Ansari is an AI Creative Designer and Web Developer based in Delhi, India. He works across website design, UI/UX, frontend development, AI-assisted creative workflows, SEO and digital experiences.
His work combines visual design with practical web development, allowing him to approach projects from both the design and implementation sides. He focuses on creating modern, responsive and purposeful digital experiences for businesses, brands and digital products.